
Already familiar with assembly language and disassemblers? Check out Reverse Engineering for Beginners Part 2 to dig into how malware is packed, obfuscated, delivered, and executed on the endpoint.
Malware researchers require a diverse skill set usually gained over time through experience and self-training. Reverse engineering (RE) is an integral part of malware analysis and research but it is also one of the most advanced skills a researcher can have. This is one of the reasons why organizations lack reverse engineering manpower. Many researchers with a lack of experience struggle to get started in RE. Gaining a solid starting point in RE with the relevant knowledge and terminologies can be a differentiator for a researcher.
This series will provide RE basics for malware researchers, analysts and IR experts who have no reverse engineering experience but wish to learn how. In Part 1, you will learn about basic computing terms and assembly language.
Intro to Malware Reverse Engineering
What is Reverse Engineering?
In software, RE is understanding the functionalities and capabilities of a compiled program.
There are different purposes for RE, from vulnerability and compiler research, to reconstructing lost source code and improving performance. Malware RE focuses specifically on understanding malware capabilities and functionalities in order to remediate threats and study different malware families.
When will you reverse engineer malware?
RE can be very time-consuming. When researching a malware, you will usually not start reversing it right away. Instead, you should conduct triage malware analysis by running the malware in a sandbox, extracting strings, and more. This initial malware analysis phase can provide further context for reverse engineering, if needed. For instance, you can search for specific strings in the disassembler or expect to see a certain capability that the malware displays.
If your goal is to understand a malware's capabilities, analyzing it dynamically via a sandbox will not be enough. The malware’s Command and Control (C2) could go down, the malware could depend on another file for configuration which does not exist on the machine, the malware has sandbox evasion capabilities, or the malware will only run on a certain environment. RE, which is part of advanced static malware analysis, is much more effective to achieve this goal.
Now, let’s jmp in ;-)
Beyond the Executable
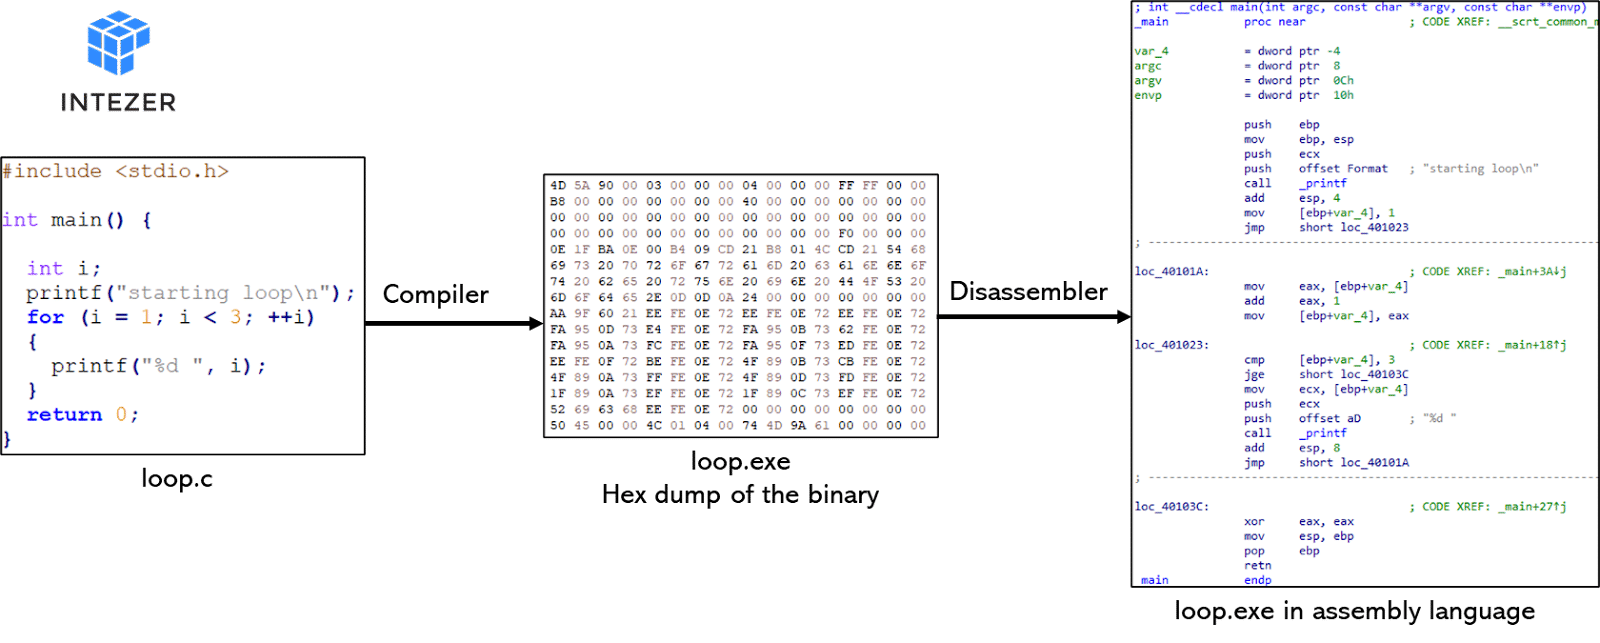
Generally speaking, software is developed using a high-level human readable programming language such as C, C++, Delphi, Golang and so on. In order for a machine to understand it, the program needs to be compiled to machine code. The compilation process translates the human readable code to a language that can be executed by the CPU. Once a program is compiled, the human readable source code is no longer available (well, not always. .NET is an example but we will not focus on cases like this). A disassembler is a tool that can convert machine code to assembly language, a human readable form of the machine instructions. The image below describes the flow.
Assembly: How Low Can You Go?
The compiler, used to compile the code to an executable, actually defines which architecture and operating system the executable can run on (there is also another type of compiler called JIT which is used for languages such as Java and .NET. It works differently but we will not focus on it here). Every central processing unit (CPU) provider (Intel, ARM, MISP, for example) has its own architecture. Each architecture uses a different instruction set which means that each sequence of bytes will be interpreted differently by the CPU. Using a disassembler, these sequences of bytes can be translated to a language called assembly.
Assembly is a human readable representation of the low-level machine code used for communication between the executable and the machine’s hardware (CPU). Because each CPU has a different instruction set, the machine code will differ between architectures.
The modern Windows architectures are x86_64 and x86, 64-bit and 32-bit respectively. We will focus on assembly for x86. To learn about how these architectures differ, check out this article.
To better understand assembly language, let’s explain the structure of the CPU.
The CPU
The CPU is a piece of hardware, an electronic circuit that processes bits with basic logic. It holds temporary memory and communicates with the Random-access memory (RAM). RAM is used to store data and the CPU is used to control that data. The CPU has three main components: Control Unit, Registers, and Arithmetic and Logical Unit (ALU).
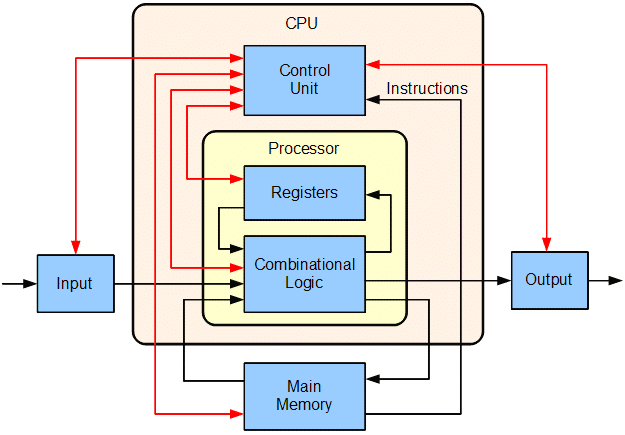
Diagram of a basic CPU. From Wikipedia
Control Unit (CU)
The CU is in charge of integrating all the CPU’s operations, including ALU, data movement within the CPU, and data exchange across external CPU interfaces. It extracts the data and instructions from memory and decodes them to commands.
Arithmetic and Logical Unit (ALU)
ALU is a digital circuit that performs arithmetic and logical operations such as add, subtract, and, or, and XOR. ALU’s Wikipedia page is great if you want to read more about its structure and how it works.
Registers
Registers are built-in variables that are used to store temporary data in the CPU. The following table lists the general purpose registers for x86 architecture.
| *Register | ||
| Accumulator register | EAX | Arithmetic operations and function’s return value |
| Counter register | ECX | Used in shift/rotate instructions and loops |
| Data register | EDX | Arithmetic operations and input output operations |
| Base register | EBX | A pointer to data |
| Source index | ESI | Points to a source in stream operations |
| Destination index | EDI | Points to a destination in stream operations |
| Stack pointer | ESP | Points to the top of the stack |
| Stack base pointer | EBP | Points to the base of the stack |
*In 64-bit CPUs, the register name will start with an “R” instead of an “E” (EAX → RAX) and the register will be 64-bit in size.
While the registers are 32-bit in size, you can also use subsections of the EAX, ECX, EDX and EBX registers via smaller sized registers. For instance, the least significant 2 bytes of EAX can be used as a 16-bit register called AX. The least significant byte of AX can be used as AL and the most significant byte of AX can be used as AH. See below.

x86 register subsections
Most of the registers are not necessarily used for their historical purpose in the modern instruction set. ESP (the stack pointer) and EBP (the stack base pointer) are two registers that have reserved their purpose. We will see them in use in the next section.
The Stack
The stack is a data structure used to store local function variables related to a program and is located as a temporary storage area inside the RAM. The stack is built as a LIFO (last in first out) queue and its memory address hierarchy is built to flow from a higher address to a lower one. This means that the stack grows down.
As mentioned in the previous section, ESP will always point to the top of the stack. If a value is added (pushed) to the stack, ESP will be decremented. If a value is read from the stack (poped), then ESP will be incremented. The memory unit’s size is 4 bytes, so the decrease and increase in memory location will take place in jumps of 4.
Generally, each function in the program will have its own stack frame. All functions will have a prologue and an epilogue. The prologue is is incharge of creating the stack frame:
push ebp - adds the original EBP value to the stack so that it can be restored at the end of the function.
mov ebp, esp - moves the top of the stack pointer to EBP, so that EBP, aka the base of the stack pointer, will point to the top of the stack.
The function’s epilogue is incharge of clearing the stack and reversing the prologue, and returns to the calling function:
mov esp, ebp - assigns the value in EBP to ESP, so that ESP will point to the base of the function.
pop ebp - pops the original stack base pointer back to the EBP so that the base of the stack is restored to its value before the prologue (the EBP of the calling function).
ret - jumps to the next instruction in the calling function.
The following animation illustrates the stack.

Instructions (Opcodes)
In the previous section we touched upon assembly language. Now, let’s understand better how the assembly code is structured. Figure 1 shows the loop.c source code and Figure 2 shows the assembly code of the compiled loop.exe.


Each line in the code has an instruction and operands. In general, any instruction may have zero operands and more. Operands can be registers, pointers to memory locations, or constants (numeric values).
Instructions can be divided into three types:
- Data transfer instructions
- Arithmetic and logic instructions
- Control flow instructions
There are different instructions. In Figure 2 above there is:
push - places its operand to the top of the stack (Data transfer instruction).
mov - copies the data from the second operand to the first (Data transfer instruction).
call - call a subroutine (Control flow instruction).
add - adds together two operands and stores the result in the first operand (Arithmetic and logic instruction).
jmp - transfers the program flow to the operand’s memory location (Control flow instruction).
jge - a conditional jump. Jump when greater than or equal to. Will usually come after a cmp (Control flow instruction).
cmp - compare the first operand to the second one (Control flow instruction).
xor - perform xor between the operands and place the result at the first operand (Arithmetic and logic instruction).
pop - removes the element from the top of the stack into its operand (Data transfer instructions).
retn - the subroutine return mechanism. This instruction will come after a pop instruction of a location in the stack memory and then performs an unconditional jump to that location (Control flow instruction).
Browse here for more examples of instructions.
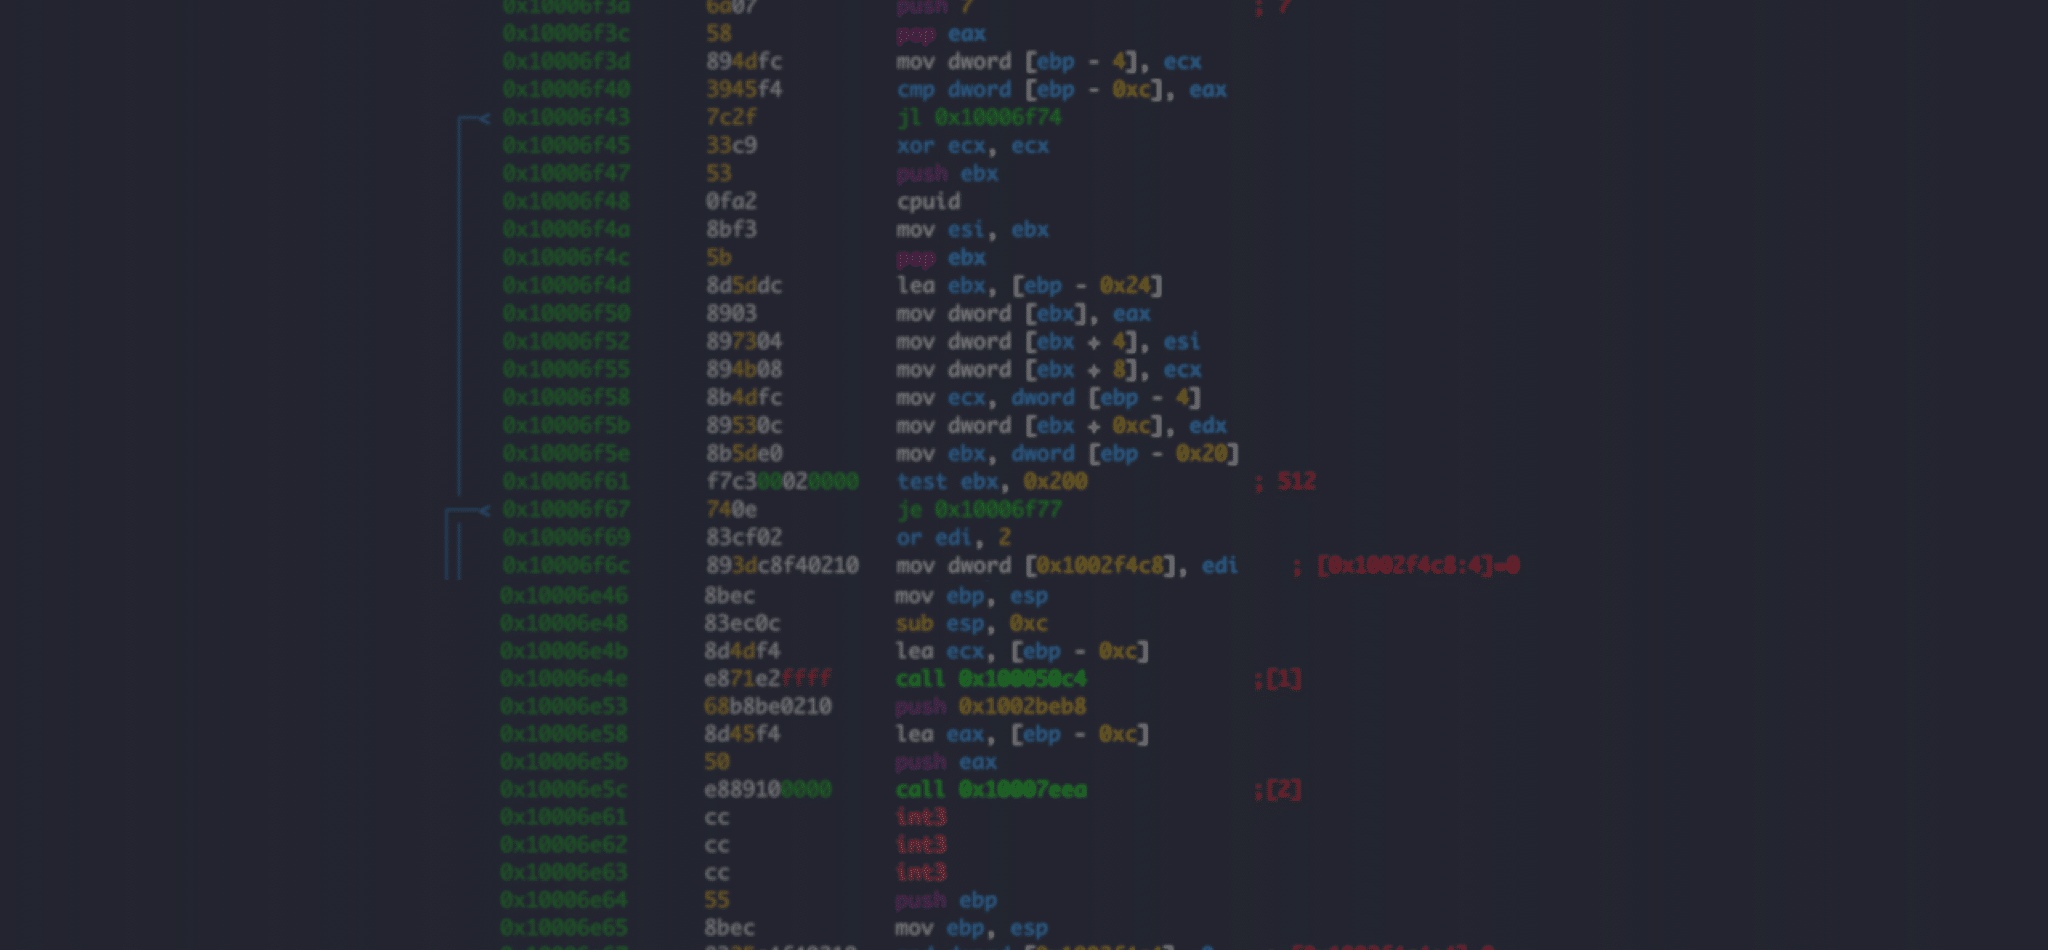
Now that you have an understanding of how the processor works and the basics of assembly, this video takes the assembly code of loop.exe, line by line, to explain what you see.
Disassemblers
Disassemblers translate the machine language to assembly. Among the common disassemblers used by reverse engineers are IDA, Ghidra, and Radare2. Ghidra and Radare2 are open-source whereas IDA has a free version. Ghidra and IDA both have a graphical interface whereas the interface with Radare2 is via command line. Over the course of this series we will work with IDA, however, it is best to explore and find which disassembler works for you.
Let’s open loop.exe in IDA (you can use drag and drop). On the left you’ll see all the functions (subroutines) that the program uses. The majority of them belong to libraries that were compiled together with the source code (we already know that the program’s logic is composed from one function). IDA will automatically open the entrypoint function. You can also type ctrl+e to get back to the entrypoint. IDA presents the code in a graph that has code blocks and graph edges that connect between the blocks. The graph edges have three different colors:
- Blue - a normal edge
- Green - if the jump is taken (its condition is satisfied)
- Red - if the jump is not taken
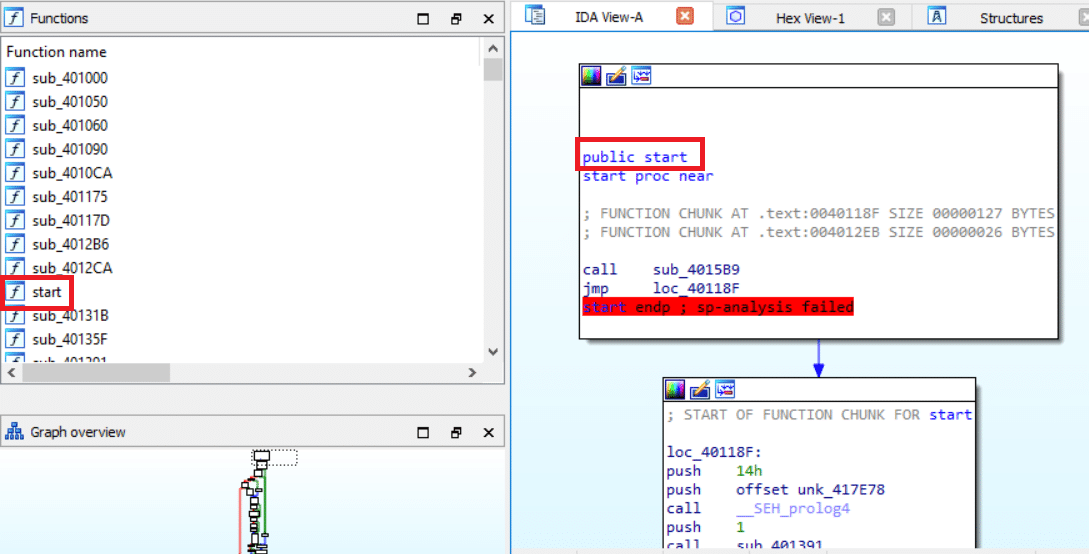
IDA view once loop.exe is loaded
The entrypoint (start function) is basically the main function of the program and is in charge of initializing the program. The main logic (the loop function itself) will be one of the subroutines that are called from the start function. As you can see, there are many subroutines called, making it hard to understand which subroutine holds the main logic.
A trick to finding our function in this case is to search for strings that are used in the functions:
1. Type SHIFT+F12 and a tab with all of the strings that are hardcoded in the binary will be created.
2. Search for the “loop” strings (CTRL+F).

“loop” string search in the string tab
3. Double click on the string which will take you to the location of the string in the binary.

The string in its location in the binary
4. Type CTRL+X on the string to get to the location of where the string is referred and click OK.
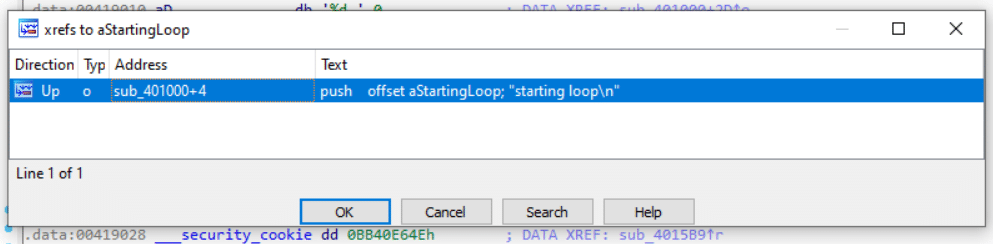
5. Look familiar? :)
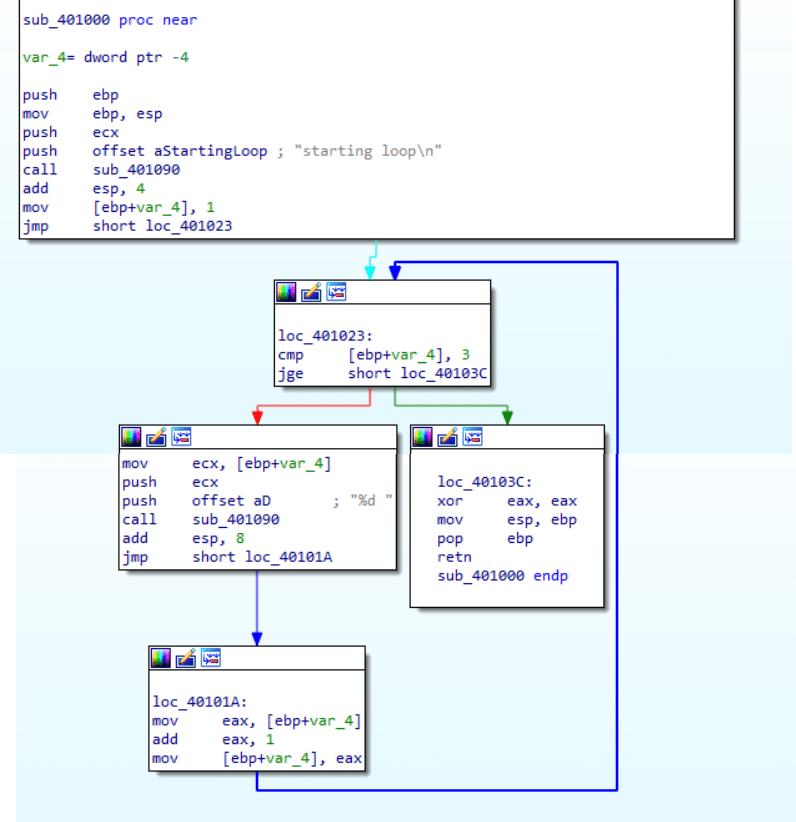
The loop function
If you click CTRL+X on the function name (sub_401000) you will see where it is called within the start function.
Check out Defkey’s IDA Pro shortcuts for more useful shortcuts.
Practice RE!
Now that you know the basics of assembly language and how to use a disassembler, you can try it yourself. In this repository you will find two executables along with their source code.
Open the executables with a disassembler and try to understand what they do. The source code is there to help you learn. Try to understand what the program does without looking at the source code :)
What’s Next?
Now you can start digging into how to reverse engineer real malware, by detecting packed malware and loaders, and using debuggers --> Reverse Engineering for Beginners: Part 2.
You don’t need to be a reverse engineer to investigate a suspicious file. Intezer automates malware analysis for you helping you quickly identify and classify malware families. Analyze malware and unknown files for free at analyze.intezer.com
Intezer
Count on Intezer AI SOC to triage, investigate and respond to every alert at unmatched speed and accuracy.
In this article
Share article
Malware Reverse Engineering for Beginners - Part 1: From 0x0
.png)
AI SOC
AI
Company News
5 minutes
Loop engineering comes to the SOC: Introducing the Intezer Org Brain
Organizational context in an AI SOC is table stakes. Org Brain is very different. It learns, it recalls, it fetches what it's missing, and it gets sharper with every alert it touches, all autonomously.

Detection Engineering
AI SOC
8 minutes
Detection engineering in the AI era
AI is lowering the barrier to sophisticated attacks. Explore why detection engineering matters and where most programs fall short.

AI SOC
CISO
Company News
Introducing Custom Agents: Automate your SOC, your way
Add your own agents and automations on top of the ones Intezer runs out of the box, take more of the manual work off your analysts, and tailor AI SOC to the way your team actually operates.