
When there is suspicious activity on an endpoint, the incident response team is responsible for investigating it to find out what happened in the network that caused the potential security breach. Is it a fast-spreading malware… or just a false positive? For anyone in digital forensics and incident response, you need to know ASAP if it’s the first, but you also don’t want to waste time investigating false positives.
There are several ways to collect files and forensics evidence, which we’ll dig into below with tips and free tools to save you time on each during incident response. These are three key areas we’ll look at where you can speed up investigations:
- HD forensics: Collecting suspicious files based on a predefined incident response plan
- Memory forensics: Using tools to get the memory dump of the compromised endpoint
- Live forensics: Scanning the runtime of the compromised endpoint
First, one of the most time consuming IR processes is determining if the suspicious activity was a false positive or not. If an infection did take place, identifying the endpoint(s) in the network that were compromised and the malicious artifacts used in the attack can also be tedious. This analysis should be done thoroughly to ensure that no information crucial to the investigation is missed. It can often feel like looking for a needle in the haystack.
Since time is a major factor when handling incidents in order to reduce the potential damage to the environment, the stakes for conducting incident investigation and response processes are high. That means you want efficient procedures and tools on hand, so your team isn’t stuck with something taking hours of time when it could have been done in minutes.
Intezer Analyze is a free tool that can help you quickly classify and analyze files collected by the forensics methods mentioned above. Let’s take you through how we’ve seen incident response teams use Intezer and other tools to get more information about forensics artifacts in minutes, not hours.
HD Forensics and Classifying Collected Files
One of the methods used to collect forensics evidence is taking an image of the compromised endpoint. This essentially makes a copy of the entire filesystem but the extracted output can reach a high volume. Analyzing the extracted data can be very time consuming for incident response teams.
In many cases, the analysis of extracted data is performed by comparing the signatures to predefined lists of known malicious hashes. While useful for identifying known malware samples, the smallest change made to a file changes its hash completely, making the new variant unrecognizable to signature detection.
There are millions of trusted and malicious software created each day. Allow lists based on hashes alone are not enough to detect all of the new threats out there.
Another challenge posed to HD forensics is files with packed payloads. One of the outcomes of an attacker packing a malware sample is it hides the malicious code and creates a new, never-seen-before hash. Since the new hash won’t be picked up by existing blocklists, the malware likely won’t be detected.
Intezer Analyze is different from signature detection. Intezer breaks each executable file into binary code patterns, also called code genes. These genes are referenced against Intezer’s vast database containing billions of code pieces from both trusted applications and malware. If a file shares code with another malware, it’s immediately flagged as malicious, and classified to the malware family it shares code with. This has proven to be very effective for detecting malware variants over time.
There are two main ways to send files to Intezer Analyze for analysis:
- Online: Submit a file using the web interface, either by hash (SHA256, SHA1, MD5) or uploading a file from your device.
- Script: Submitting a collection or a folder of files and/or hashes at once can be accomplished using a script created with Intezer’s
- SDK. The output of the script, shown below, contains the details of all files that were identified as malicious or at least suspicious by Intezer Analyze. This method saves you time that would usually have to spend classifying and analyzing files.

Using a script based on Intezer’s SDK to analyze a folder that contains several files. The output provides links to the analysis reports for all the malicious and suspicious files in question, including their verdict, malware family name and SHA256.
More detailed information can be found on the web UI. If you open the analysis of the last file from the script, you can see the full analysis report.

This sample is identified as a Loki variant since it shares code genes with other samples from the same malware family, seen in the process tree resulting from the execution of the file in a sandbox.
Next, you can view the TTPs with each technique mapped to the MITRE ATT&CK® framework. Also, the IoCs tab provides network information and hashes of the files that were dropped by the malware. All of this information can be downloaded in a CSV format.
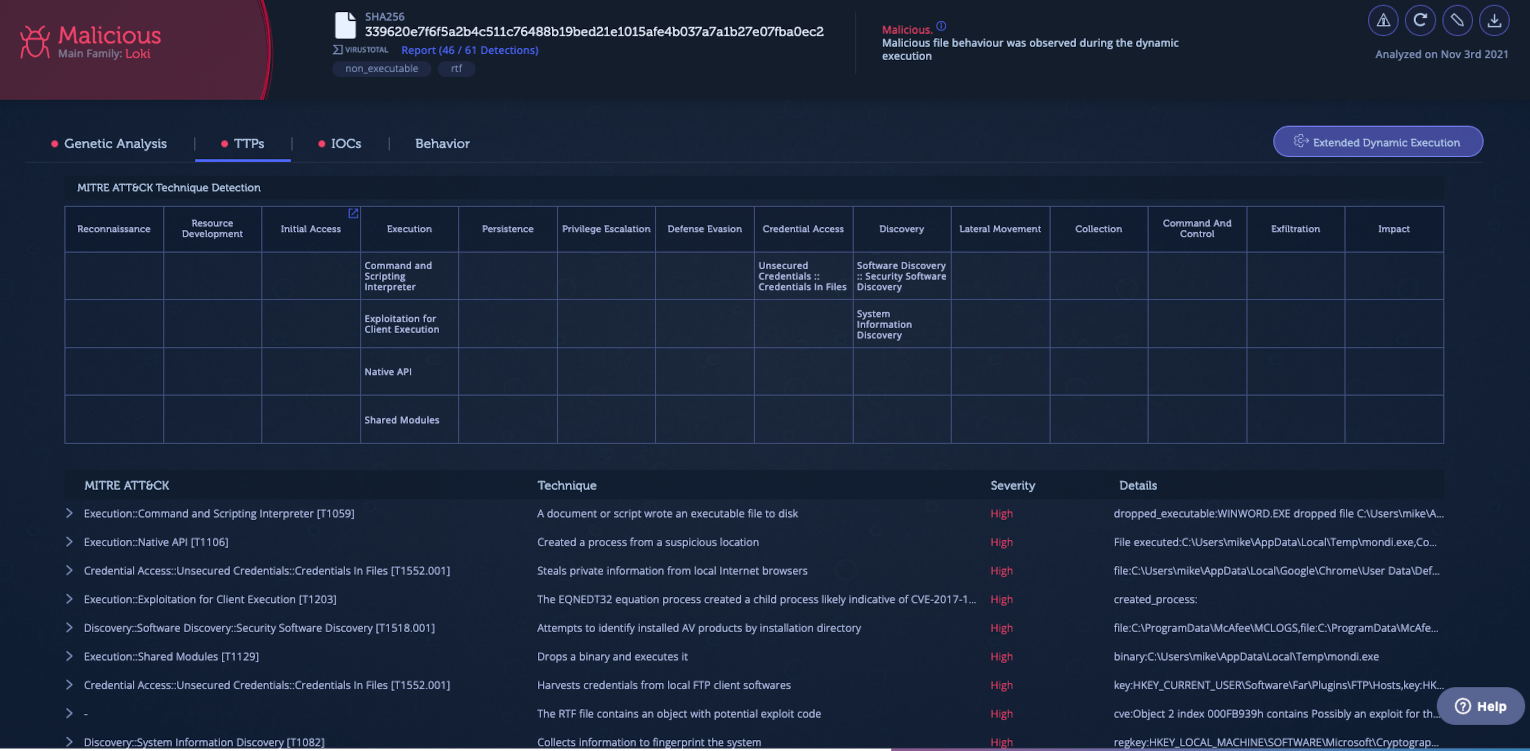
Under TTPs, you can see that among the capabilities of this sample are that it collects identification information about the system and has information stealing capabilities. This makes sense considering that the sample shares most of its code with Loki, an information stealing malware. The information presented further supports the classification of the file as Loki.

Intezer Analyze also provides a code-based vaccine for each threat which can be downloaded in several formats, including YARA, STIX, Stix2, and OpenIOX. Signatures that are based on code are stronger than string-based signatures because they are produced from the specific code that executes a certain functionality in the malware. You can use the vaccine and the information provided in the IoCs and TTPs tabs to detect similar files in the environment using your existing security tools like SIEM, EDR and XDR.

For new threat variants, the analysis may show a portion of unique code as a result of new capabilities and features added to the malware. In this case, an investigator might want to get more information about the threat. If a deeper analysis of the file is needed, Intezer has plugins for IDA Pro and Ghidra. Both plugins enrich the assembly code with Intezer’s unique code reuse insights. These plugins accelerate the reverse engineering process and allow the analyst to focus solely on the malicious components by filtering out the trusted and library code sections.
Analyzing Memory Dumps to Improve Incident Response Time
Another source of forensics evidence is based on the volatile memory of the compromised endpoint. This method presents the image of all running processes and produces a smaller amount of files which need to be analyzed. There are several popular tools that are used for memory acquisition of Windows machines such as Dumpit, WinPmem, and Process Hacker. The most common tool to inspect memory dumps is Volatility. By using Intezer with the Volatility plugin (available as a free trial), you can get a full code reuse analysis of the memory dump in just a few minutes.

To run the plugin, use your Intezer Analyze API key, which can be passed as an argument or set in the environment variables of the system. The results of the execution can be viewed in the Endpoint and Memory Scans report page and they will look similar to this:
The memory scan shows the classification of all running code and processes collected from memory and analyzed using the Volatility plugin.
As you can see, the incident response team benefits from classifying all threats and their capabilities, which normally takes hours or even days when using EDRs.
Scan Compromised Endpoints to Detect Threats Loaded In-Memory
The advantage of scanning the runtime of compromised environments is having the ability to detect malicious processes that are being executed, even if they managed to evade detection and bypass other security tools.
Scanning the runtime environment of the endpoints can be extremely useful for conducting digital forensics and incident response (DFIR). With this approach, once an alert on an endpoint is triggered, the investigator can obtain the memory dump and scan it for any malicious artifacts, making it possible to find the necessary artifacts and narrowing the scope of the investigation around the presented evidence.
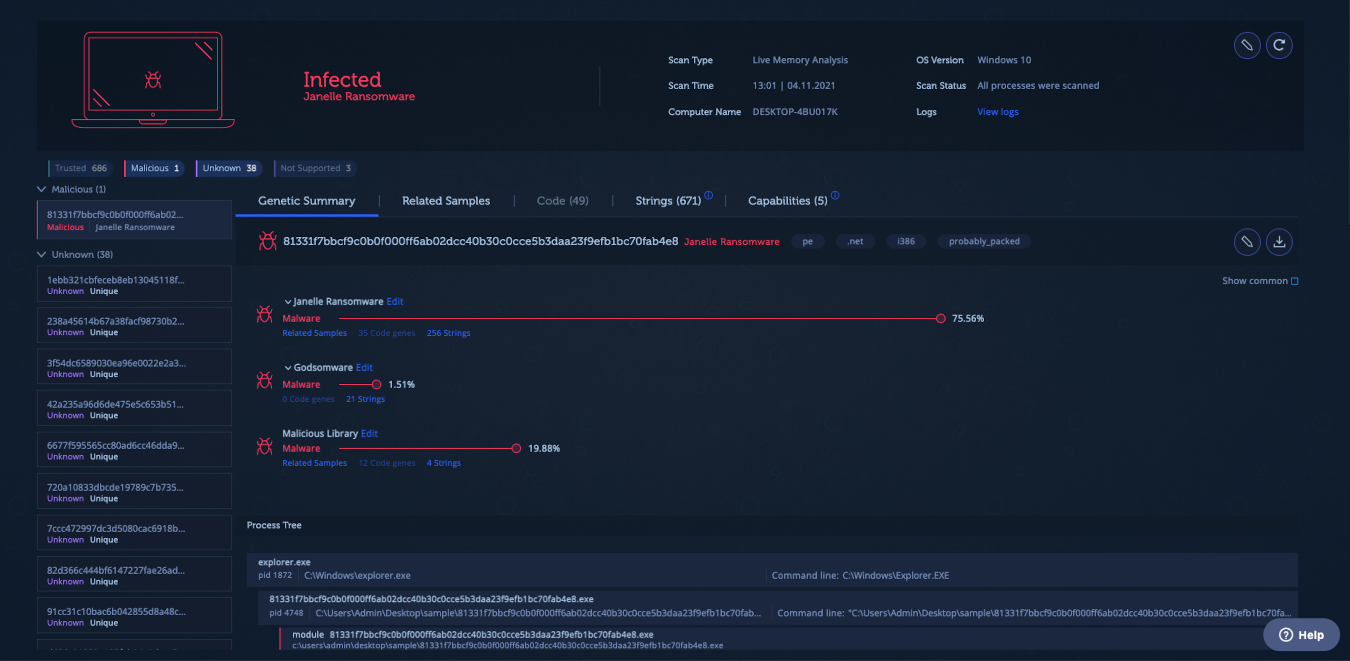
In this case, the Intezer Analyze endpoint scanner can be executed on a compromised Windows endpoint. It collects all of the loaded processes and analyzes them using Intezer’s code comparison technology. You can see the result on the Analyze web UI. The scanner saves investigators not only the effort of collecting memory dumps, but also the time spent analyzing them.
Below is an endpoint infected with Formbook malware:

Results from the endpoint scanner show a malicious process that was detected as Formbook information stealer. The scanner quickly picked up the malicious process and identified it without the need for manual investigation.
Get the Tools for More Efficient Incident Response
The features, tools and plugins mentioned in this blog are aimed at making the lives of incident responders easier and more efficient. All the tools mentioned above are free or have free trials available. Sign up to Intezer Analyze for a free community account to start taking advantage of these tools and save time the next time you’re investigating an incident.
Tools mentioned in this article:
File analysis with Intezer Analyze
IDA Pro plugin
Ghidra plugin
Endpoint scanner
Intezer’s SDK